Remote SSH login has become an essential tool for managing IoT devices running on Ubuntu. With the growing adoption of IoT technology, securely accessing and managing remote devices is critical for both personal and enterprise environments. Whether you're a developer, system administrator, or hobbyist, understanding how to configure and use SSH for IoT devices can significantly enhance your productivity and security.
SSH, or Secure Shell, provides a secure method for accessing and controlling remote systems. This article will walk you through the process of setting up and configuring SSH for IoT devices running on Ubuntu. By the end, you'll have a clear understanding of the best practices and tools needed to ensure secure and efficient remote management.
This guide is tailored for those who want to delve deeper into IoT management. From configuring SSH to troubleshooting common issues, we'll cover everything you need to know to master remote SSH login for IoT on Ubuntu.
Read also:Unveiling The Art Of Love Heartfelt Drawings For Her
Table of Contents
- Introduction to SSH
- Why Use SSH for IoT Devices?
- Installing SSH on Ubuntu
- Configuring SSH
- Connecting to IoT Devices via SSH
- Best Practices for Secure SSH Connections
- Troubleshooting Common Issues
- Automating SSH Logins
- Alternative SSH Clients
- Conclusion
Introduction to SSH
SSH, or Secure Shell, is a cryptographic network protocol designed for secure data communication between two devices over an unsecured network. It allows users to remotely log in to and manage systems securely. In the context of IoT, SSH plays a vital role in enabling administrators to access and configure IoT devices remotely.
Ubuntu, being one of the most popular Linux distributions, provides robust support for SSH. By default, SSH is not installed on Ubuntu, but it can be easily set up using the command line. Once installed, SSH enables secure communication between your local machine and IoT devices, ensuring data integrity and confidentiality.
For IoT devices, SSH is particularly useful because it allows administrators to manage and monitor devices without physical access. This is especially important in scenarios where IoT devices are deployed in remote locations or in large-scale deployments.
Why Use SSH for IoT Devices?
Using SSH for IoT devices offers several advantages:
- Security: SSH encrypts all data transmitted between the client and server, protecting sensitive information from unauthorized access.
- Reliability: SSH connections are robust and can be configured to withstand network interruptions, ensuring continuous access to IoT devices.
- Flexibility: SSH supports a wide range of commands and tools, making it versatile for various IoT applications.
- Efficiency: With SSH, administrators can automate tasks and manage multiple devices simultaneously, streamlining IoT deployment and maintenance.
Compared to other remote access methods, SSH stands out due to its strong security features and ease of use. For IoT devices running on Ubuntu, SSH is the go-to solution for secure remote management.
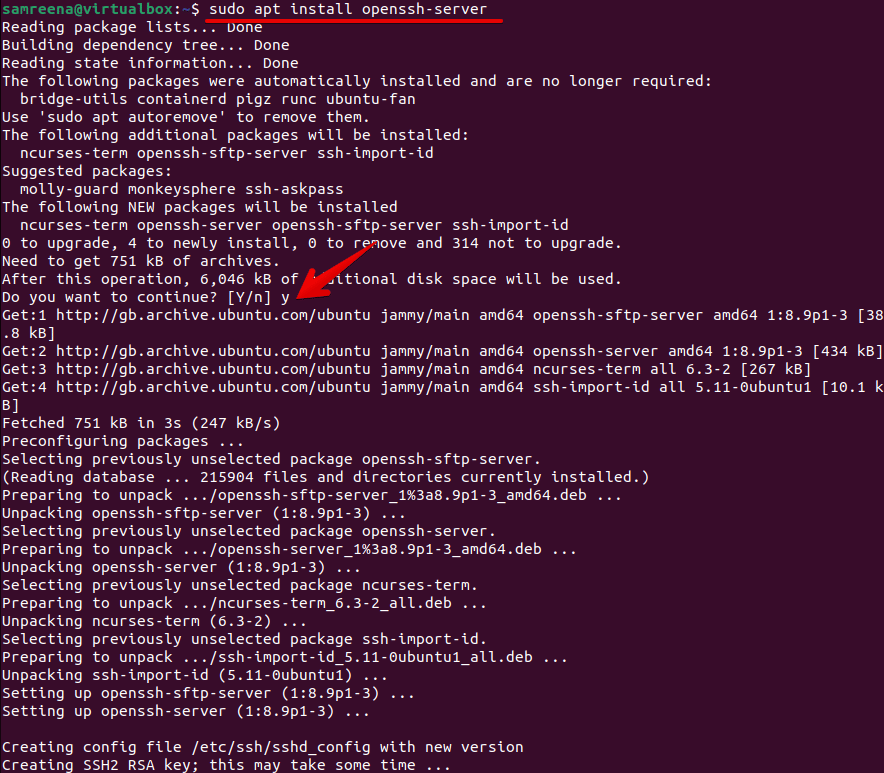
Installing SSH on Ubuntu
Installing SSH on Ubuntu is a straightforward process. The first step is to install the OpenSSH server, which allows your IoT device to accept incoming SSH connections. Follow these steps:
Read also:Discover The Best Of Bollywood With Bolly4u 23612348 Your Ultimate Entertainment Guide
- Open the terminal on your Ubuntu-based IoT device.
- Update your package list by running the command:
sudo apt update. - Install the OpenSSH server using the command:
sudo apt install openssh-server. - Verify that the SSH service is running with the command:
sudo systemctl status ssh.
Once the installation is complete, your IoT device will be ready to accept SSH connections. Ensure that the device is connected to the network and has a static IP address for consistent access.
Configuring SSH
Basic Configuration
After installing SSH, the next step is to configure it according to your needs. The main configuration file for SSH is located at /etc/ssh/sshd_config. Open this file with a text editor using the command:
sudo nano /etc/ssh/sshd_config
Here are some basic configurations you can make:
- Port: By default, SSH listens on port 22. You can change this to a non-standard port to reduce the risk of unauthorized access.
- PermitRootLogin: Set this to "no" to disable root login, enhancing security.
- PasswordAuthentication: Set this to "no" to disable password-based authentication and enforce the use of SSH keys.
After making changes, restart the SSH service using the command: sudo systemctl restart ssh.
Advanced Security Measures
For added security, consider implementing the following advanced measures:
- Use SSH Keys: Generate and use SSH keys for authentication instead of passwords. This eliminates the risk of brute-force attacks.
- Firewall Rules: Configure firewall rules to allow SSH traffic only from trusted IP addresses.
- Fail2Ban: Install and configure Fail2Ban to automatically block IP addresses that exhibit suspicious behavior.
These measures will significantly enhance the security of your SSH setup, making it more resistant to attacks.
Connecting to IoT Devices via SSH
Once SSH is configured on your IoT device, you can connect to it from a remote machine. On Linux or macOS, open the terminal and use the following command:
ssh username@ip_address
Replace "username" with the username of your IoT device and "ip_address" with the device's IP address. If you're using a non-standard port, include it in the command:
ssh -p port_number username@ip_address
On Windows, you can use tools like PuTTY or Windows PowerShell to establish an SSH connection. Ensure that the SSH client is installed and configured properly.
Best Practices for Secure SSH Connections
To ensure secure SSH connections for IoT devices, follow these best practices:
- Regular Updates: Keep your Ubuntu system and SSH server up to date with the latest security patches.
- Strong Passwords: Use strong, complex passwords and avoid reusing them across multiple devices.
- Limit Access: Restrict SSH access to only authorized users and IP addresses.
- Monitor Logs: Regularly review SSH logs for any suspicious activity.
Adhering to these practices will help protect your IoT devices from potential threats.
Troubleshooting Common Issues
Despite careful configuration, issues can arise when setting up SSH for IoT devices. Here are some common problems and their solutions:
- Connection Refused: Ensure that the SSH service is running and that the device is connected to the network.
- Authentication Failed: Verify that the username and password are correct. If using SSH keys, ensure that the key is properly installed on the server.
- Timeout Errors: Check the network connection and ensure that there are no firewall rules blocking SSH traffic.
Refer to the SSH logs for more detailed information about the issue. The logs are located at /var/log/auth.log.
Automating SSH Logins
Automating SSH logins can save time and reduce the risk of errors. One way to achieve this is by using SSH keys for authentication. Follow these steps:
- Generate an SSH key pair on your local machine using the command:
ssh-keygen. - Copy the public key to your IoT device using the command:
ssh-copy-id username@ip_address. - Test the connection by logging in without entering a password.
For added convenience, you can configure SSH aliases in your ~/.ssh/config file, allowing you to connect to devices with a single command.
Alternative SSH Clients
While the default SSH client is sufficient for most users, there are several alternative clients that offer additional features:
- PuTTY: A popular SSH client for Windows, offering a user-friendly interface and advanced configuration options.
- MobaXterm: A powerful SSH client for Windows that includes a terminal emulator and X11 server.
- Termius: A cross-platform SSH client available for mobile devices and desktops, providing a seamless remote access experience.
Choose the client that best suits your needs and preferences.
Conclusion
Mastering remote SSH login for IoT devices on Ubuntu requires a combination of technical knowledge and best practices. By following the steps outlined in this guide, you can set up a secure and efficient SSH environment for managing your IoT devices. Remember to regularly update your systems, monitor logs, and implement advanced security measures to protect against potential threats.
We encourage you to share your experiences and tips in the comments section below. For more in-depth guides and tutorials, explore our other articles on IoT and Ubuntu. Together, let's build a safer and more connected world!